

Curing is the process that turns freshly cut buds into aromatic, smooth and stable flower. Without it, residual moisture stays trapped unevenly, the chlorophyll does not finish breaking down and the more volatile terpenes evaporate before you can enjoy them. The specific aim is to reduce the internal moisture of the cut plant to a level suitable for stable storage, going through a container cure that keeps humidity controlled for weeks.
The reference ranges that guide the whole process are:
- Drying: suitable temperature and relative humidity for slow, controlled drying over a long enough period to preserve terpenes and avoid defects
- Curing: mild conditions and controlled humidity for several weeks to allow aromas to stabilise and develop
- Storage: a cool environment, with moderate humidity, in darkness and an airtight container to maintain quality over the long term
Verdict: without slow drying and patient curing, you lose aroma, texture and stability, no matter how well you looked after the plant during growing.
The choice of genetics matters from the very beginning, too. Varieties with well-defined terpene profiles respond better to long cures, and that starts with choosing seeds of proven quality before the harvest.
What happens inside the bud during drying?
Drying isn’t simply “leaving it to dry”. Inside the bud, physical and biochemical processes take place that determine the quality and the final aromatic profile.
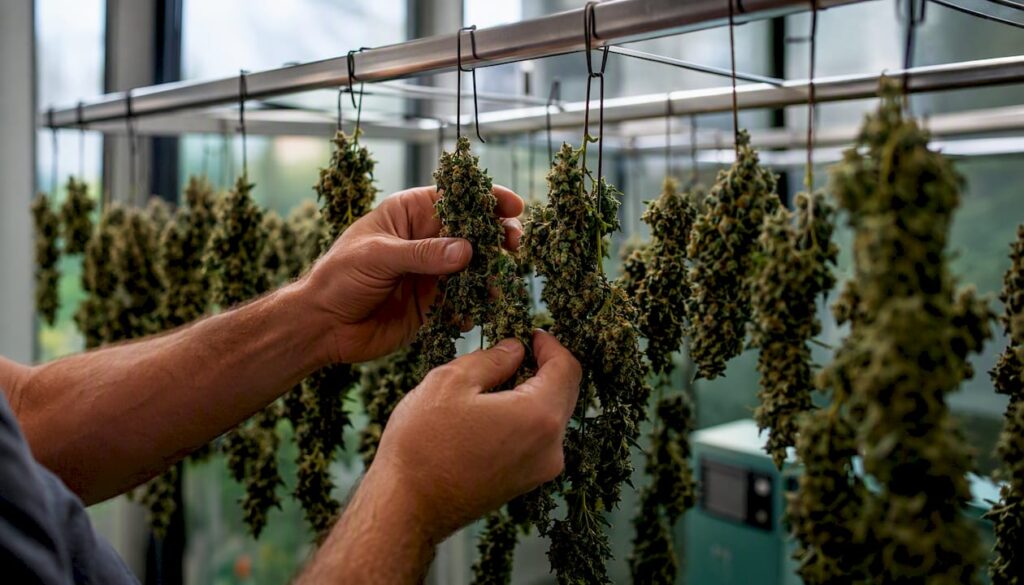
Evaporation draws water from the outside of the flower towards the inside. If the air is too dry or the airflow too aggressive, the surface layer hardens before the moisture inside can migrate out. This phenomenon, known as case hardening, creates a dry crust that traps moisture in the centre, which encourages mould and produces sour flavours during curing. Drying “low and slow”, as PhenoDB recommends in its drying and curing guide, is precisely the way to avoid it: 10–14 days at 15–18 °C and 55–65 % RH allow the moisture to migrate evenly.

Enzymatic activity also works during this phase. Enzymes break down chlorophyll, starches and residual sugars, which reduces the grassy flavour and harshness. In addition, partial decarboxylation of THCA begins, although this process continues during curing and is completed by heat when consumed.
Terpenes are the most fragile variable. Monoterpenes, responsible for citrus and floral aromas, are highly volatile and evaporate with high temperatures or direct airflow. Drying at temperatures above a moderate threshold can wipe out in days what the plant took months to produce.
Physical indicators you should watch for:
- Outer texture dry to the touch but buds with some moisture left inside
- Smell that shifts from damp vegetal to more concentrated and variety-specific
- Stem-snap test (stem-snap): small stems should break with a clean snap, not bend; thicker stems may stay flexible, but thin branches should break
Pro tip: if the buds dry in less than 5–6 days, the temperature or airflow is excessive. You can correct this by partially closing the ventilation inlets and adding a passive humidifier to raise the RH to the target range.
What happens during curing and why does it improve the flower?
Once the buds go into the jar, the stage that most growers underestimate begins. Curing is not passive storage: it is an active stabilisation in which moisture redistributes from the inside of each bud towards the surface and back again, until the water content evens out uniformly.
Several simultaneous transformations take place during this process:
- Additional chlorophyll breakdown: the green compounds that produce a grassy flavour and harsh smoke continue to break down in the sealed container. An experimental study from McGill University found significant differences in colour and chlorophyll content between drying methods, and recommends curing at approximately 62 % RH to avoid harsh smoke and reduce the risk of microbial contamination.
- Maturation of the terpene profile: sesquiterpenes, which are heavier and more stable than monoterpenes, express themselves better over time. Extended curing allows these compounds to settle and the aroma to gain complexity and depth.
- Textural stabilisation: the redistributed moisture gives the buds a more uniform texture, neither dusty nor spongy.
What curing does not do is increase the total amount of cannabinoids. THCA is already in the flower at the time of cutting; curing doesn’t create more. What it does do is refine the experience: better combustion, a more complex aroma and a lower risk of grassy flavours. According to Ed Rosenthal, the practical benchmark of 60 °F (16 °C) and 60 % RH as a starting point for curing consistently balances smoothness and stability.
The term “fermentation” is sometimes used to describe curing. Technically, curing involves controlled enzymatic activity, not microbial fermentation. The confusion comes from similar processes in tobacco or tea, but in cannabis the aim is precisely to avoid excessive microbial activity by keeping the RH below the risk threshold.
How to dry step by step: conditions, methods and checklist
Preparation before hanging
Before cutting, decide whether you’ll do a wet trim (immediate manicuring) or a dry trim (manicuring after drying). Dry trimming preserves terpenes better because the leaves act as a protective barrier during drying, although it requires more work afterwards. Clean the space with isopropyl alcohol and make sure there are no remains of previous crops that could introduce spores.
Practical drying methods
- Hanging whole branches (branch hang): the most widespread method. The branches hang upside down on strings or rods. It allows even drying and is easy to set up in a grow tent with climate control.
- Mesh or racks: useful for buds that have already been trimmed or for spaces with limited height. Air circulates on all sides, but you need to turn the buds every 1–2 days to avoid flat spots.
- Drying in a tent with climate control: the most repeatable option for home growers. Using your own grow tent with a small dehumidifier and a low-speed fan lets you maintain stable conditions without extra investment in equipment.
The scientific review published in Molecules compares advanced methods such as freeze-drying (lyophilisation), which retains the highest amount of phytochemicals but has a prohibitive cost for home use. For most growers, air drying with temperature and RH control remains the most practical and accessible option.
Checklist for setting up a home drying space
- [ ] Temperature between 15–18 °C (digital thermometer with min/max memory)
- [ ] RH between 55–65 % (calibrated hygrometer)
- [ ] Indirect ventilation: the fan moves the air in the room and does not point directly at the buds
- [ ] Total darkness or minimal light (UV light degrades cannabinoids)
- [ ] No cross-draughts that speed up surface drying
- [ ] Daily visual check to spot mould or uneven drying
The stem test to know when to move on to curing
Bend a small stem 3–4 mm in diameter. If it snaps with a clean crack, the buds are ready for the jar. If it bends without breaking, they need more time. The buds should feel dry to the touch but not crunchy or dusty; they should still have some life and resilience.

Pro tip: if some buds pass the stem test before others, separate them by size from the start. Smaller buds always dry sooner and can become over-dried if you leave them alongside the large ones.
How to cure properly: jars, burping and schedule
The curing protocol in glass jars is the benchmark standard for home growers because it lets you control RH precisely and spot problems before they spread.
Target conditions and type of container
The conditions for curing are 15–20 °C and 58–62 % RH inside the jar. Airtight glass jars (such as Mason jars or Weck) are the best option because they do not transfer flavours or compounds to the product. Plastic, even high-quality plastic, can absorb terpenes and alter the aroma over time.
Step-by-step protocol
- Fill the jars to about 75 % of their capacity to leave room for air.
- Close and leave to rest for 12–24 hours.
- Open the jar (burping) for 5–10 minutes to refresh the air and release gases.
- If the RH inside the jar exceeds 65 %, leave the jar open for longer or add a small desiccant bag.
- If RH drops below 55%, add a humidity-control pack at 62% (Boveda type or a generic equivalent).
- Repeat the daily airing during the first week; reduce to every 2–3 days in the second week.
Recent research suggests that, when using sealed containers with built-in humidity control, frequent venting may be unnecessary for growers with precise monitoring equipment. For home growers without continuous sensors, daily venting remains the safest way to spot problems in time.
Curing schedule table
| Stage | Duration | Ventilation frequency | Signs to continue |
|---|---|---|---|
| Initial | Weeks 1–2 | Daily (5–10 min) | Stable RH at 58–62 %; no ammonia smell |
| Development | Weeks 3–4 | Every 2–3 days | More defined aroma; uniform texture |
| Optimal | Weeks 5–8 | Once a week | Complex terpene profile; clean combustion |
| Long term | 3+ months | Monthly or less | For varieties with very complex profiles |

According to Soft Secrets, the recommended minimum is 2–4 weeks, the sweet spot for most varieties is between 6–8 weeks, and cures of 3 months or more develop terpene profiles of a complexity that simply can’t be achieved earlier.
Pro tip: place a small jar hygrometer inside each jar during the first two weeks. Reading the RH without opening the jar saves you time and reduces exposure to air.
How can you prevent mould and avoid the most common mistakes?
Post-harvest mould doesn’t appear out of nowhere: there is always a condition that encourages it, whether it’s RH that is too high, insufficient ventilation or infected material that went into the drying room from the plant. Identifying the root cause is what stops it happening again at the next harvest.
Warning signs you should recognise
- Grey or white tips on the buds (botrytis or mildew)
- A smell of damp, wet earth or slightly of ammonia when opening the jar
- Spongy or sticky texture in buds that should be dry
- Visible condensation on the jar walls when you open it
Most common causes
- RH above 65% during drying or curing
- Case hardening from drying too quickly (moisture trapped inside)
- Plants showing signs of botrytis or mildew before cutting that were not removed
- Storage in plastic bags without humidity control
- Forgetting to ventilate the jars during the first week
Action plan if you detect mould
- Immediately isolate the affected jar or batch from the rest.
- Remove buds with visible signs of mould; do not mix them with healthy material.
- Check the ambient RH and adjust the dehumidifier or ventilation.
- Inspect the rest of the jars by opening them one by one.
- If the mould is superficial and limited, dry the affected material at a slightly higher temperature (20–22 °C) for 24–48 hours before deciding whether it is salvageable.
The DryGair post-harvest guide details quick-response procedures and preventive practices centred on ventilation, hygiene and humidity control as the three pillars for avoiding botrytis and other fungi.
Preventive checklist for future harvests:
- Inspect the plants before cutting and discard branches showing signs of infection
- Clean the drying room with isopropyl alcohol before each use
- Keep the RH of the drying room below 65 % from day one
- Don’t stack buds on top of each other in nets; leave space between them
- Record temperature and RH with a continuous-logging hygrometer
How do you maintain quality after curing in the long term?
A well-executed cure can be ruined within weeks if storage doesn’t maintain the right conditions. Trichomes are fragile physical structures that degrade with heat, light and oxygen; terpenes, for their part, continue to evaporate slowly even in a closed container if the temperature is high.
The ideal storage conditions are 15–18 °C and 55–60 % RH, in total darkness. According to Excellent Nutrients’ post-harvest recommendations, environmental control and careful handling of the trichomes are critical for preserving cannabinoids and terpenes once curing is finished.
Long-term storage checklist:
- Glass jars with an airtight seal, clean and dry before use
- Total darkness: cupboard, box or opaque bag
- Stable temperature: avoid areas with frequent temperature changes (near windows, radiators or fridges with cooling cycles)
- Humidity-regulating pouch at 58–62% to maintain RH without ventilation
- Minimal contact with oxygen: fill the jars as full as possible or use oxygen absorbers for large batches
- For large batches, a cold chamber such as a wine fridge at 15–16 °C is the most practical alternative in Europe
The factors that speed up degradation are, in order of impact: direct UV light, temperatures above 22–24 °C, repeated exposure to oxygen and humidity outside the target range. Controlling the first three is enough to maintain quality for several months.
In short:
- “Low and slow” principle: dry at 15–18 °C and 55–65 % RH for 10–14 days to preserve terpenes and avoid case hardening.
- Stem test (stem-snap): thin branches should break with a clean snap before you move the buds to the jar.
- Minimum curing time: at least 2–4 weeks; 6–8 weeks for optimal profiles; 3+ months for maximum complexity.
- Mould control: Keep the RH in the jar between 58–62 % and air it daily during the first week to spot problems in time.
- Bluedoggenetics: Varieties with defined terpene profiles respond better to long curing; choose quality seeds from the start.
Curing is where patience turns into quality
Most growers who get frustrated with curing make the same mistake: they treat it as passive waiting rather than as an active production phase. “Low and slow” is not just a cautionary tip; it is the mechanism that allows enzymatic reactions to finish their work, moisture to redistribute without creating risk pockets, and the most complex terpenes to settle instead of evaporating.
What convinces me most about this approach is that the results are reproducible. Once you have the ranges clear (15–18 °C for drying, 58–62 % RH for curing) and the basic equipment calibrated, each harvest can improve on the last in a systematic way. There’s no magic in the process, just consistency.
Every genetic needs its own adjustments. A compact bud from a dense indica variety may need 14 days of drying where an open sativa finishes in 10. That isn’t a problem; it’s information you build up harvest after harvest, making your process more and more precise.
Seeds that respond well to long curing: Bluedoggenetics catalogue
If you’ve made it this far, you already have the protocol. The next step is to make sure the genetics of your next harvest are worth curing with patience.
Strains with terpene profiles rich in myrcene, limonene or linalool are the ones that gain the most from cures of 6–8 weeks or more. At Bluedoggenetics you will find a selection of feminised and autoflowering seeds from renowned seed banks, designed for growers who want consistent results and complex aromas. Shipping is discreet, order tracking is in real time and quality guarantees are included.
Visit the Bluedoggenetics shop to see the full catalogue and choose the variety that best suits your space and your curing goals. If you already know what you’re after, you can go straight to complete your order and have your seeds on their way before next season.
Useful sources and recommended reading
- Drying and curing guide | PhenoDB: practical reference on temperature and RH ranges, case hardening and the “low and slow” principle with field evidence
- Cannabis drying and curing: why drying and curing matter as much as the grow — Ed Rosenthal: explanation of the 60 °F/60% RH standard, the stem test and using the grow tent as a drying room.
- The art of drying and curing: technology for elite cannabis — Soft Secrets: recommended curing times (2–8+ weeks) and the use of hygrometers and control technology.
- Optimizing post-harvest processing of cannabis for smokable products — McGill University: experimental study on the effects of the drying method on chlorophyll, colour and cannabinoids; recommendation of 62 % RH.
- Post-harvest in cannabis: quality, terpenes and cannabinoids — Excellent Nutrients: recommendations on trichome handling, storage conditions and oxygen and light control.
- Cannabis post-harvest: how to avoid mould — DryGair: preventive practices and rapid response procedures for signs of post-harvest infection.