


The success rate of cannabis germination rarely fails for lack of technology. It fails because of details you can control from day one. If you want to germinate cannabis seeds step by step without wasting time or money on seeds that don’t sprout, this guide gives you exactly what you need: ideal conditions, compared methods, correct handling of the radicle, and solutions to the most common problems. Whether it’s your first grow or you already have experience, here you’ll find concrete answers so that every seed counts.
Key points
| Point | Details |
|---|---|
| Controlled temperature and humidity | Keep it between 22 and 26 °C with humidity like a wrung-out sponge to trigger germination. |
| Choose the method according to your experience | The kitchen paper method is ideal for beginners; direct sowing is better for autoflowering plants. |
| Minimal handling of the radicle | Touch only the shell with clean tweezers so you don’t damage the root tip. |
| Plant at the correct depth | Bury 0.5 to 1.5 cm deep with the radicle pointing downwards. |
| Patience prevents losses | Don’t discard seeds before 7 to 10 days if the environment is well controlled. |
Germinating cannabis seeds step by step: preparation and conditions
Before your seed sends out its first root, the environment must already be ready. The germination process for cannabis seeds isn’t complicated, but it is sensitive. Basic temperature control and humidity is all you need for a viable seed to wake up within 24 to 72 hours, with no laboratory or expensive equipment.
Basic materials you need
Here is the real list, no frills:
- Quality seeds: The most important starting point. A seed with poor genetics will not germinate well no matter which method you use.
- pH-neutral water: Ideally between pH 6.0 and 6.5. Tap water can work if you let it stand for 24 hours to evaporate the chlorine.
- Kitchen paper or jiffy: Depending on the method you choose.
- Small pot or propagation tray: For direct sowing or transplanting after germination.
- Light substrate: Seedling compost, a mix of perlite and coco, or peat. Something that drains well and does not compact.
- Spray bottle: To keep humidity up without waterlogging.
- Clean tweezers: Essential for handling the seed without touching the radicle with your fingers.
💡 Pro tip: Disinfect your tweezers with isopropyl alcohol before using them. Even minimal contamination at this stage can ruin the radicle within hours.
Optimal environmental conditions

Optimal germination happens between 22 and 26 °C, with relative humidity between 70% and 90%. Too cold slows the process or stops it altogether. Too hot dries out the medium and kills the seed before it opens.
| Factor | Ideal range | Sign of a problem |
|---|---|---|
| Temperature | 22 a 26 °C | Below 18 °C stops germination |
| Relative humidity | 70% a 90% | Below 50% dries out the paper or substrate |
| Oxygen | Free movement | Waterlogged medium blocks access |
| Light | Total darkness | Direct light stresses the seed at this stage |
For indoor cannabis growing, a propagator with a lid creates the perfect microclimate without needing a full grow room. If you want to go deeper into how to set up that space, Bluedoggenetics’ guide to setting up your grow room covers the environmental details that have the biggest impact on germination.

Methods for germinating cannabis seeds
There are several proven methods. None is universally superior, but each has clear advantages depending on your situation. Below I explain the four most commonly used, with their real steps.
Method 1: kitchen paper (the most popular)
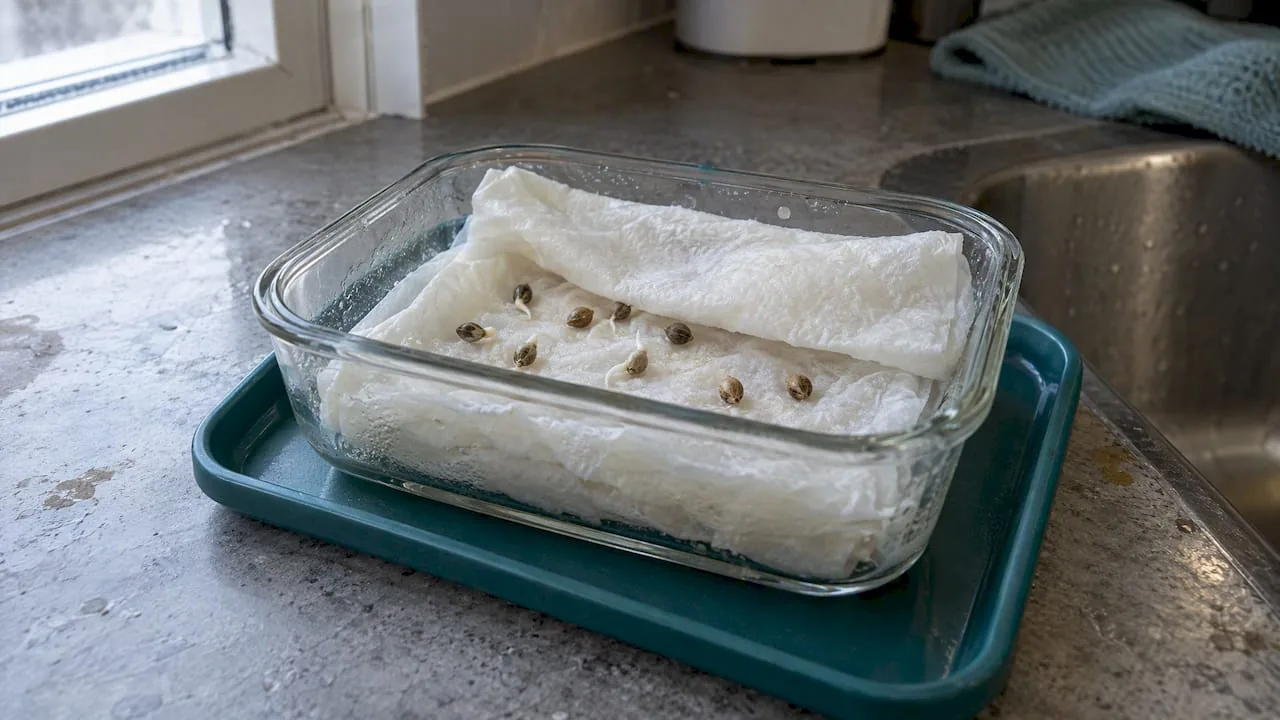
- Dampen two sheets of kitchen paper with neutral pH water until they are moist but not dripping.
- Place the seeds on a sheet, leaving at least 2 cm of space between them.
- Cover with the second damp sheet.
- Put everything inside a dish or container with a lid, in a dark place at a constant temperature.
- Check every 12 hours without moving the paper. Within 24 to 72 hours you’ll see the radicle appear.
The advantage of this method is that you can watch the progress before planting. The risk is that the radicle sticks to the paper, so act before it grows longer than 1 cm.
Method 2: jiffy or peat pellets
Jiffy pellets are compressed peat discs that expand when moistened. You place the seed directly in the centre with the tip facing down, cover it lightly, and keep the jiffy in a propagator. This method reduces handling of the radicle because you move the jiffy directly into the substrate without transplanting the seed.
Method 3: sowing directly in substrate
Make a 1 cm hole in damp seedling soil, place the seed with the tip facing down, cover gently without compacting, and mist the surface. For autoflowering varieties, sowing directly into the final pot is the best option because avoiding transplanting improves root development without interruptions.
Method 4: pre-soaking in a glass of water
Soak the seeds in water at 22 °C for 12 to 24 hours. This step softens the shell and activates the germination enzymes. Then move the seeds to kitchen paper or the substrate. Don’t leave the seeds in the water for more than 24 hours, as the lack of oxygen can harm them.
| Method | Main advantage | Disadvantage | Ideal for |
|---|---|---|---|
| Kitchen paper | Visible and controllable | Risk when transplanting | Beginners |
| Jiffy / peat | Minimal root handling | Requires a propagator | All levels |
| Direct sowing | No transplanting | You can’t see the radicle | Autoflowering |
| Pre-soaking in water | Triggers fast germination | It can drown if it exceeds 24 h | Hard or old seeds |
💡 Pro tip: Combine pre-soaking (12 hours in a glass of water) with the jiffy method for seeds that have been stored for more than a year. You reduce the waiting time and the stress of transplanting at the same time.
Care after germination
Once the radicle appears, the work is not over. This is the stage where most mistakes are made out of enthusiasm. The radicle is extremely fragile. Handling it only by the shell with clean tweezers is the golden rule. Touching the white tip directly, even gently, can break or contaminate it.
How to plant correctly
Bury the germinated seed at a depth of 0.5 to 1.5 cm with the radicle pointing downwards. Do not compact the substrate over it. The root needs space to grow without resistance. Cover the hole with loose soil and spray the surface with pH-neutral water.
Controlling humidity and light after sowing
The most destructive mistake at this stage is too much water. Waterlogging suffocates the roots and causes rot in less than 48 hours. Mist the surface when you notice the substrate losing moisture to the touch. Never water with a direct stream, because it displaces the seed.
When the cotyledons (the first small leaves) appear, switch on a soft, indirect light. Soft light starts photosynthesis without stressing the seedling. In indoor growing, an 18-hour photoperiod at low intensity is enough for the first few days.
Daily checklist for this stage:
- Check that the substrate is damp to the touch but not soaking.
- Check that the ambient temperature stays between 22 and 26 °C.
- Check that there is no mould or stains on the substrate.
- Watch whether the cotyledons open and turn green.
- Avoid moving the pot or handling the seedling unnecessarily.
To fine-tune your watering routine over the coming weeks, how often to water cannabis is a resource that will help you avoid the most common oversaturation mistakes.
Common problems and their solutions
Germination doesn’t always go to plan. These are the problems that come up most often and how to solve them without throwing seeds in the bin.
- The radicle hasn’t appeared after 72 hours. First check the temperature. If it’s below 20 °C, that’s your answer. Raise the ambient temperature to 24 °C and wait. Seeds can take up to 7 to 10 days in less than ideal conditions and shouldn’t be discarded prematurely.
- The kitchen paper is too dry or too wet. If it is dry, the seed does not have enough moisture to activate its internal processes. If it is soaking, you block the oxygen. The right moisture is like a wrung-out sponge: damp to the touch but not dripping.
- The seed opens but the radicle grows upwards. This happens when the seed was planted upside down. It isn’t fatal. The root will reorient itself through geotropism, but avoid it from the start by placing the tip of the seed facing down.
- Mould appears on the paper or substrate. It’s a sign of high temperature with excess humidity and little air circulation. Open the propagator slightly, reduce the humidity and check the temperature.
- The seed floats in the glass during pre-soaking. This does not mean it is bad. Some seeds float at first. Gently push them to the bottom. If they are still floating after 4 hours, it may indicate low density, but let the full 12 hours pass before judging.
“Don’t discard any seed before day 10 if you’re keeping it in the right conditions. I’ve seen seeds germinate on day 9 and turn into completely normal, productive plants.” Patient observation, without frequent handling, improves the overall success rate.
My perspective: patience is worth more than technique
I’ve seen plenty of beginner growers invest in sophisticated propagators, digital thermometers and premium substrates, and still fail because they open the propagator every two hours to check, or because they overwater out of nervousness.
What I’ve learned most is this: successful germination depends more on the grower’s self-control than on technology. The right environment, stable temperature, moisture without excess, and leaving the seed in peace are the factors that make the difference. Not the price of the equipment.
I have also noticed that most losses happen at transplanting. The radicle is touched with fingers, bent, broken. A seed that germinated perfectly dies at the moment it is moved to the substrate. Using tweezers, moving calmly and planting at the right depth is the difference between a 60% and a 95% success rate.
The impact of good germination extends across the whole cycle. A seedling that gets off to a stress-free start has more vigour, a better root structure and, as a result, a higher final yield. Don’t underestimate this stage.
Quality seeds for successful germination
The whole process you have just learnt depends on a starting point you cannot control after buying: the seed’s genetics. A low-quality seed may never germinate, no matter which method you use.

At Bluedoggenetics you’ll find a curated selection of premium feminised and autoflowering seeds with a quality guarantee and discreet shipping. Every variety in the catalogue is chosen to maximise yield from germination to harvest, both in indoor and outdoor growing. If you’re looking for additional guides to complement your grow, the Bluedoggenetics cannabis blog has specific resources for every stage of the process. Start with the right genetics and the rest of the journey becomes much easier.
Frequently Asked Questions
How long does a seed take to germinate?
The radicle usually appears within 24 to 72 hours in ideal conditions of 22 to 26 °C. Under less optimal conditions, the process can take up to 7 to 10 days without this indicating a serious problem.
Which germination method is best for beginners?
The kitchen paper method is the most recommended for beginners because it lets you watch the radicle’s progress before planting, which reduces the risk of mistakes when transplanting.
Can I use tap water to germinate cannabis seeds?
Yes, but let it stand for at least 24 hours so the chlorine evaporates, and check that the pH is between 6.0 and 6.5. Water with active chlorine can inhibit germination or damage the radicle.
Why did my seed germinate but the seedling isn’t growing?
The most common causes are too much water, inadequate light or a temperature that is too low. Check that the substrate isn’t waterlogged and that the temperature stays above 20 °C. Introduce soft, indirect light once the cotyledons are visible.
Do autoflowering seeds need a different germination method?
The germination process is the same, but sowing directly into the final pot is especially recommended for autoflowering varieties because avoiding transplanting protects the root system and encourages uninterrupted growth from day one.
Recommendation
- Complete guide to germinating cannabis seeds – BLUEDOG GENETICS Seeds
- The Ultimate Guide to Cannabis Home Cultivation in Germany – BLUEDOG GENETICS Seeds
- Your Cannabis Garden – Cannabis Blog: Growing Guides, Curiosities and Culture
- How to grow Gelato Auto: Complete step-by-step guide for Autoflowering – BLUEDOG GENETICS Seeds