

Most germination guarantees only cover a minimum percentage of the seeds in the pack and require documented proof within a set period from purchase, usually around a month. If your seeds do not reach that minimum, the seller will usually offer a replacement or store credit, almost never a full refund. Document the process from day one: keep your proof of purchase, photograph the seeds and note the dates before touching anything.
In short:
- The germination guarantee only covers failures in the seed opening and the radicle appearing within a period of several weeks, and does not cover later problems or storage errors.
- It is essential to run a germination test at home using a reproducible method, controlling temperature and documenting it with photos and tables, in order to present valid evidence to the seller.
- The claim requires formal documentation: proof of purchase, photos of the process, a results table and proof of correct storage, sending everything in a single, well-organised message to the seller.
- Most warranties do not cover seeds with natural dormancy, very small seeds, or seeds that failed to germinate because of inadequate storage conditions.
- Before buying, it’s worth asking about the exact guarantee percentage, deadline, accepted method, batch origin and shipping conditions to avoid disputes later on.
What the seed germination guarantee really covers
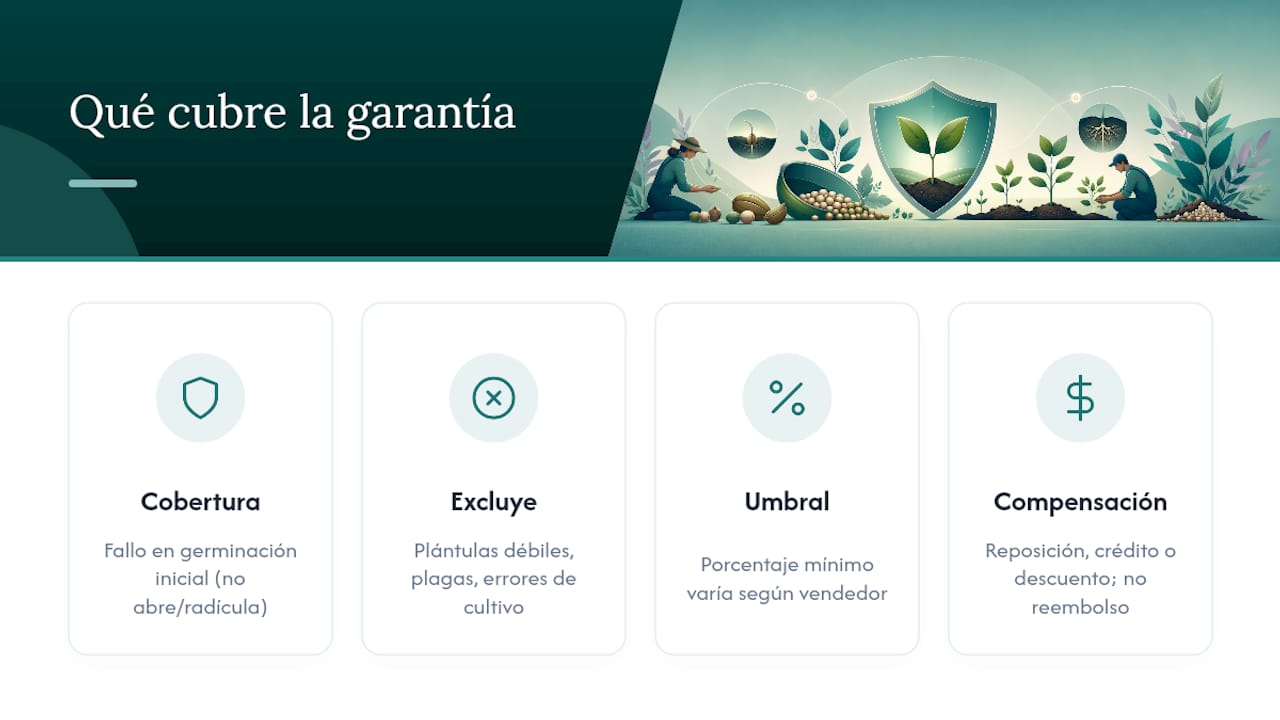
A germination guarantee is not a blank cheque. It covers only failure in the initial germination phase, that is, the seed not opening and sending out its radicle within a reasonable time. It does not cover what happens afterwards: weak seedlings, hermaphroditism, pests or growing errors fall outside the agreement, however much the buyer insists that “the seed was bad”.
Minimum percentages vary depending on the seller, with a usual market range that tends to settle at a broadly accepted percentage for effective germination out of the total in the pack. Below that threshold the claim usually succeeds; above it, even if you have lost a seed or two, the seller is within their rights to reject it.
The deadlines for submitting claims are usually several weeks from the date of purchase or receipt of the order, although some sellers may offer shorter periods or extend the deadline in cases of justified delay.
As for compensation, almost no serious seller refunds money in cash. The usual options are replacement with equivalent seeds, store credit for your next purchase or, in some cases, a discount applied directly to your next order. Each option usually comes with conditions: replacement requires that the same variety is still in stock, and store credit usually has an expiry date.
How to do a germination test at home that works as proof
A home germination test is only worth something to the seller if it can be reproduced and is properly documented. Saying “I planted ten and three came up” won’t do: you need a method, controlled conditions and dated photographic evidence.
Pro tip: always keep the original seed packaging until the test is finished. Many sellers ask to see the intact packaging or the batch code as part of the documentation.
Professional laboratories that apply the ISTA Rules for germination testing work with 4 replicates per batch and observe the seeds for up to 21 days before closing the report. At home you don’t need that level of rigour, but copying the logic of repeating the test in small groups, instead of germinating the whole pack at once, is what makes your evidence credible.
Follow these steps for a solid home test:
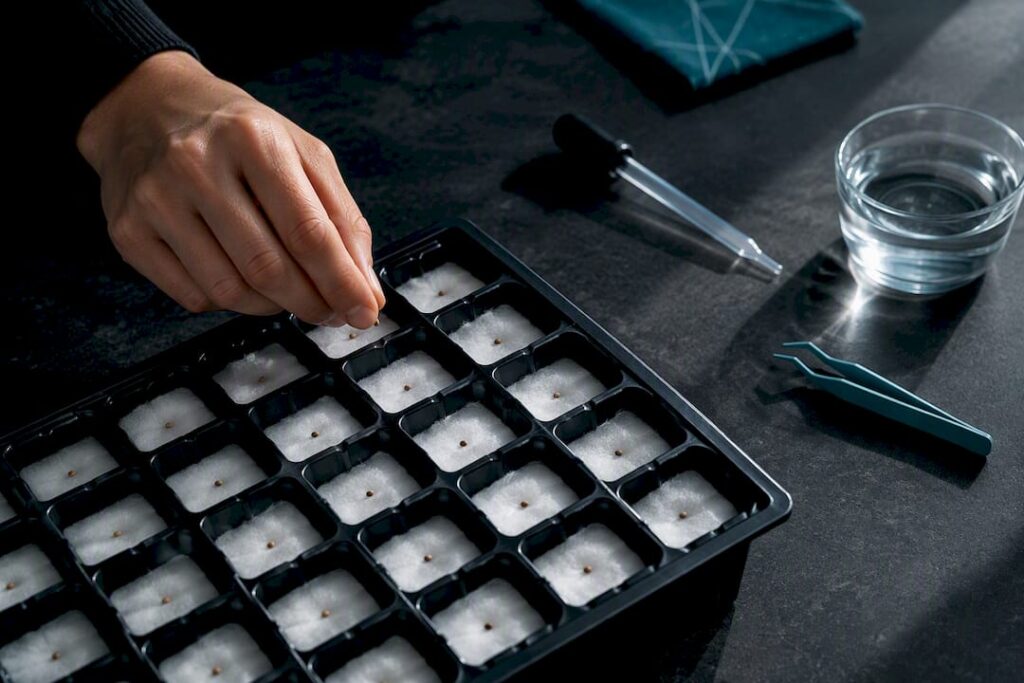
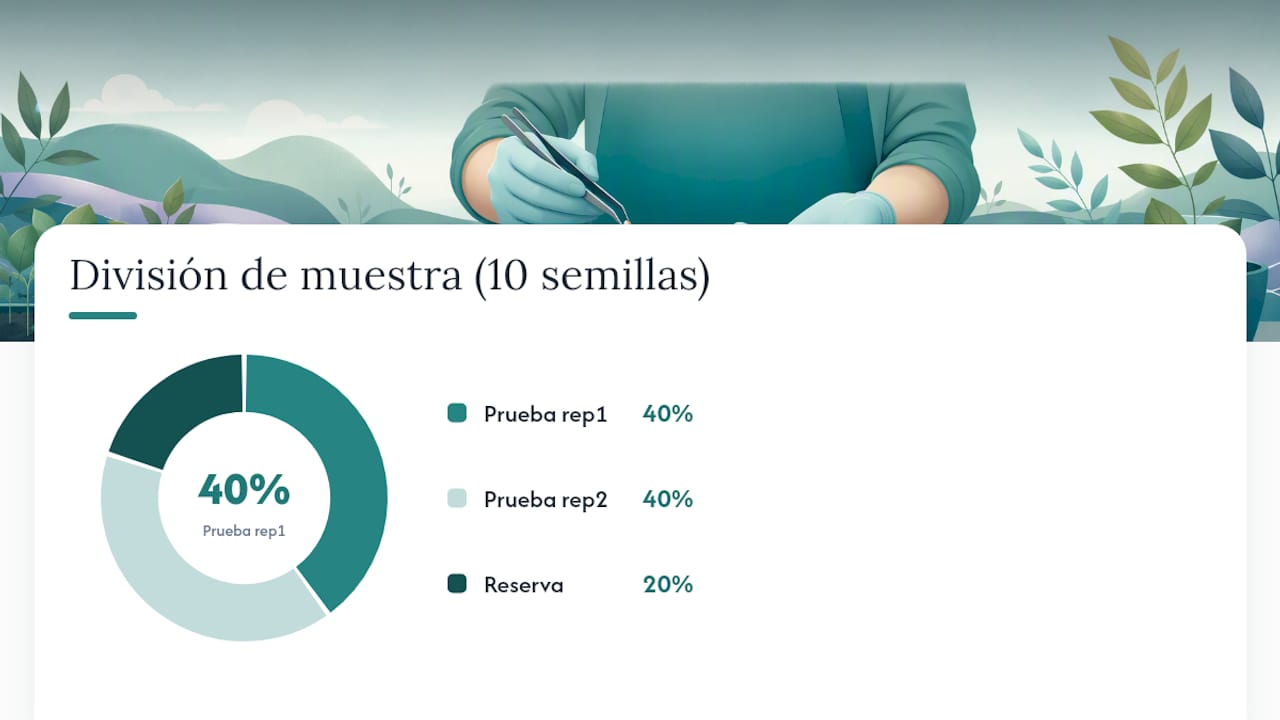
- Split the sample. If you have 10 seeds, try 2 groups of 4 and keep 2 in reserve in case you need to repeat. Never germinate the whole pack on the first attempt.
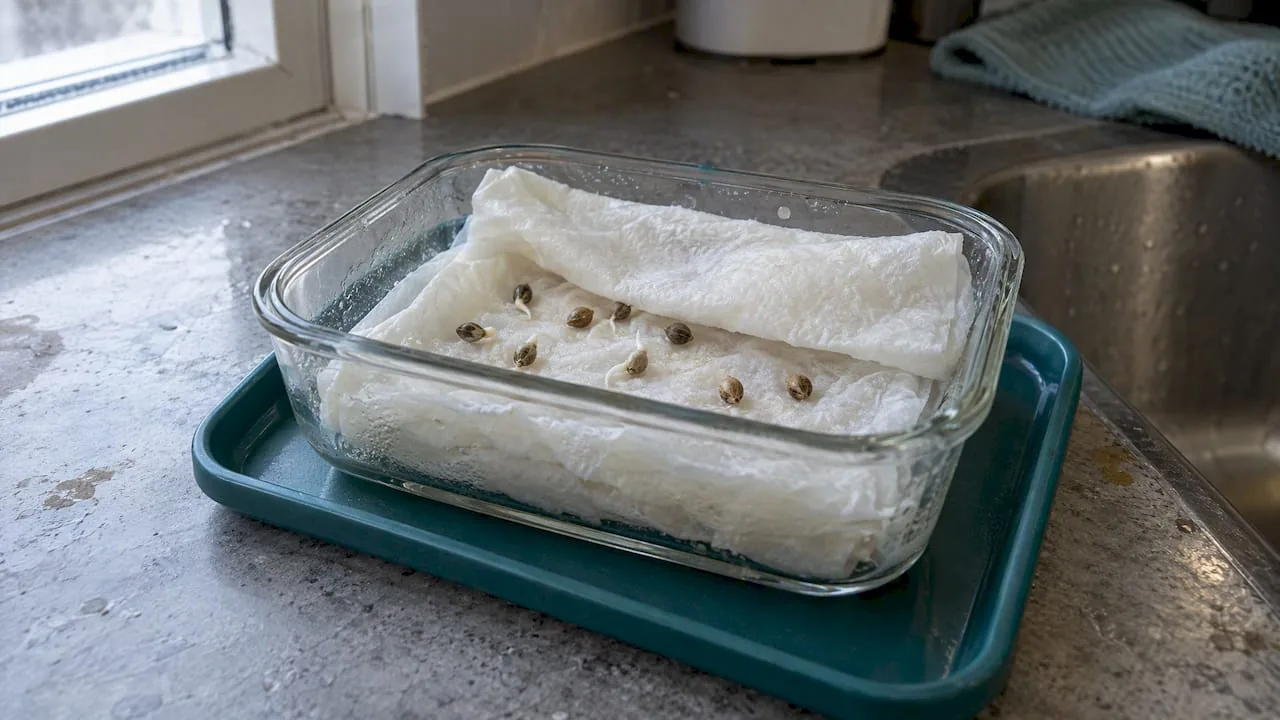
- Choose a consistent method. Damp paper between two plates, jiffy pellets or a light substrate all work well; the important thing is not to mix methods between repetitions of the same test.
- Control the temperature. Keep the environment between 22 and 26 °C, as recommended by this cannabis germination guide. Sudden temperature swings are one of the most frequent causes of failure and one of the hardest to prove afterwards.
- Observe daily without over-handling. The radicle usually appears within 24 to 72 hours; in less than ideal conditions it can take up to 7 days, according to this step-by-step germination guide. If there are no signs after that time, record the seed as failed, but do not throw it away just yet.
- Photograph every day with the date visible. Use a piece of paper with the date handwritten next to the seeds, or turn on your phone’s timestamp. Name the files using the date and repetition number format, for example, “2026-03-04-rep1”.
- Calculate the percentage and record it in a simple table. Germinated seeds divided by the total seeds in the repetition, multiplied by one hundred. Note down the result for each group separately, not just the overall average.
If one repeat gives a result very different from the others, don’t discard it or hide it: repeat it with the reserve seeds before sending the claim. An unexplained outlier undermines the credibility of the whole report. You can use this complete guide to germinating cannabis seeds to fine-tune your method before repeating the test.
What documents the seller asks for to accept your claim
No serious seller accepts a verbal complaint. Documentation is what separates an informal complaint from a claim with a contractual basis, and the more organised your submission, the quicker the response usually is.
- Proof of purchase, with the order date and, if the seller states it on the packaging, the seeds’ batch number.
- Photo or video evidence of the whole process: the package received, the sample germinating day by day and the final result.
- A results table with the number of seeds tested, the method used, the approximate temperature and the percentage obtained per repetition.
- Confirmation that storage was correct: some sellers ask where you kept the seeds before germinating, because excessive heat and humidity speed up the loss of viability.
The shipping channel matters too. Most online shops handle these claims by email or through a support form, almost never through social media, where the reply isn’t formally recorded. Send everything in a single, well-organised message: proof of purchase, table and photos attached, with the order number in the subject line. This reduces back-and-forth and speeds up the review of your case.
What the germination guarantee does not cover
This is where most misunderstandings arise, because buyers tend to think the guarantee covers “the plant turning out well”, and it doesn’t. The guarantee covers only the seed opening and the radicle appearing. Everything that happens after that is excluded.
- Post-germination problems, such as seedlings dying from overwatering, fungal diseases or transplanting errors, are not covered under any circumstances.
- Incorrect storage by the buyer. Keeping the seeds somewhere damp or excessively warm for weeks before germinating can invalidate the claim, because reducing internal moisture by just 1 % or lowering the storage temperature by about 5.6 °C can double a seed’s lifespan, and the opposite effect also applies.
- Seeds with natural dormancy, which need a prior treatment (scarification or prolonged soaking) in order to germinate. Failing to germinate on the first attempt does not always mean the seed is dead; it may be dormant or hard, categories that the technical testing standards themselves recognise as distinct from a non-viable seed.
- Very small packs, of 1 to 3 units, where the statistical margin of error makes applying a minimum percentage of little practical use; many sellers expressly exclude these formats from the standard guarantee.
Pro tip: if a seed doesn’t germinate in the first week, don’t throw it away. Some varieties go into a dormant state and respond to a second soak in lukewarm water. Trying again before making a claim saves you wasting time on a complaint the seller can reject on the grounds of normal dormancy.
Storing seeds properly before sowing them is as decisive as the germination process itself; this guide to seed storage and preservation explains how to stop moisture or heat from ruining a batch before it reaches your hands.
What to ask the seller before buying seeds
A good share of warranty disputes are avoided simply by asking beforehand, not afterwards. A transparent seller has no problem putting these conditions in writing.
- Ask for the exact guarantee percentage and the time limit in days, in writing, before paying. A vague answer such as “almost all of them germinate” is not a guarantee, it is a promise with no contractual value.
- Ask which test method they accept as valid. Some sellers only accept damp paper, others ask for a video of the whole process; knowing in advance saves you from repeating the test.
- Find out about the origin of the batch. A seller who mentions quality controls or their own germination trials usually has more serious traceability processes than one who gives no reference at all.
- Confirm the recommended shipping conditions when you receive the parcel. If the seller states that you must sow within a certain period after delivery, make a note of it and stick to it.
- Keep evidence from the moment of delivery: a photo of the sealed package, the delivery stamp and the shipping date. That initial evidence supports any later claim, even before you start the germination test.
These kinds of specific questions about warranty, deadlines and support are exactly what you should settle before paying; you can review what to demand from a seed seller in this guide to customer service for seeds.
What Bluedog Genetics offers to back up your purchase
The seller publishes quality conditions and gives buyers detailed germination and storage guides, designed so that you can document your test properly from day one. It is not just about selling seeds, but about supporting the process until the plant takes off.
- The blog’s own resources with step-by-step germination protocols, useful as a reference before opening the packet.
- Specific guides on storage and preservation, so you know exactly how to keep your seeds while you decide when to sow.
- Personalised customer service and order tracking, which makes it easier to resolve warranty questions before they turn into a formal claim.
- A seed germinator explained in detail for anyone looking to standardise the process and reduce variables between repeat runs.
Using these resources before germinating, not after a failure, is what makes the difference between a well-founded claim and a complaint that nobody can validate.
Why documentation matters more than the percentage
The conclusion repeated in every technical source on germination is the same: the number matters less than the way you prove it. A buyer who presents a 60 % germination rate with dated photos, clear repetitions and a tidy table is more likely to have their claim succeed than someone who just writes “nothing germinated”, even if their actual percentage is worse.
What most buying guides don’t tell you is that seed vigour and germination are different things, and that distinction is constantly lost in complaints. Vigour is lost before the ability to germinate, so a batch can pass the minimum germination threshold and still perform poorly under the stress of a real grow. If you notice weak seedlings despite acceptable germination, it is not a warranty fault but a sign of low vigour, and very few retailers offer vigour tests because they are costly and poorly standardised outside the laboratory.
My practical advice: prioritise reproducibility over quantity. Test a few seeds but under controlled, repeated conditions, rather than germinating the whole pack at once and hoping for the best. It’s the difference between having a solid claim and having only a suspicion.
Buy seeds with a real guarantee and support from day one
This seller is a direct alternative to buying on forums or from sellers without traceability: every order includes personalised tracking and clear quality conditions, something you rarely find outside serious specialist shops. If you are looking for varieties with a good germination reputation, feminised seeds are the most requested option for those who want predictability in their grow, while autoflowering seeds tend to be the preferred entry point for beginners who want shorter cycles with less margin for error.
Before buying, if you have any doubts about delivery times or warranty conditions, contact the customer service team to get them resolved in writing, as this very guide recommends. And once your order arrives, keep the receipt and follow the testing protocol explained earlier before sowing the whole batch at once. Have a look at the full Bluedog Genetics shop to compare varieties according to your experience and the growing time you are after.
To verify the technical procedures
If you’d like to look more closely at the standards behind these tests, the SAG technical instructions for seed sampling and analysis detail the ISTA Rules applied in the laboratory, and the analysis of seed vigour by Plan Agropecuario explains how vigour is measured beyond basic germination.
Sources
Frequently Asked Questions
What are the 4 stages of seed germination?
The seed goes through water absorption (imbibition), activation of internal enzymes, emergence of the radicle and, finally, development of the stem and the first leaves. The stage that tends to fail and lead to complaints is the emergence of the radicle, which normally happens between 24 and 72 hours, as noted in this guide to germination.
How do you do a valid germination test at home?
Divide the sample into small groups, use a consistent method such as damp paper or substrate, keep the temperature between 22 and 26 °C and photograph the process with the date visible. Professional laboratories use up to 4 replicates and 21 days of observation, and replicating that logic on a small scale gives your claim more credibility.
How long does a seed take to germinate?
In optimal conditions, the radicle appears within 24 to 72 hours. In less favourable conditions it can take up to 7 days, and if there are no signs after that time, it is best to mark the seed as failed before repeating the test.
What is germination vigour and why does it matter?
Vigour measures the speed, uniformity and ability of a seed to emerge under stress conditions, not just whether it germinates or not. It is a more sensitive predictor than standard germination and explains why a batch can pass the minimum germination threshold and still produce weak seedlings.
How much do Bluedog Genetics seeds cost?
Prices vary depending on the variety and the pack format, and are available directly in the online shop. Shipping costs are calculated during checkout according to destination and order volume.